Introduction
Vocals are one of the main components of most songs in modern music. Most listeners will pay the greatest attention to vocals when listening to a song for the first time. Imagine you've just finished a recording session, edited the tracks and are now getting ready to mix them in order to make them sound good and integrate them optimally into the mix.
In contrast to many other instruments, vocals are rather demanding to mix. So how do you make your vocals sound as good as possible before you release your music? That's what this article will be about. In a few steps, I'll show you how to handle your recorded vocal tracks to get the best possible results with the typical tools like equalizer, compressor, as well as room effects like delay and reverb, and give you some tips on how to use your vocal tracks.
Decide how your vocals should sound
Before you start mixing the vocals, you should determine what you are going for. A common mistake with mixing is to just follow some tutorials without knowing if you want exactly that sound. You should always mix towards a certain goal. If you add certain elements to the signal chain, you should have a specific sound in mind. In this way, every decision you make is more accurate and brings you closer to the sound you want. This is especially important with vocals because they are so different from genre to genre.
In rock and metal vocals are traditionally rougher and more powerful. They use more distortion and a slower attack in compression. In electronic and pop music, vocals are usually extremely consistent and exciting. Many effects and compression are used here. In folk and jazz the vocals are rather natural and often sound almost unedited. You will surely notice that every musical genre has specific characteristics of the optimal vocal sound. How do you decide what kind of vocal you want? Select a few tracks for reference and take their vocal sound as a guide. Once you've decided on a particular vocal style, you're ready to start mixing.

Equalization I - Clean up your vocals:
First you have to bring raw order into the frequency spectrum of your vocals.
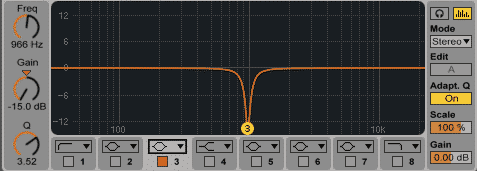
If you didn't record your vocal in an acoustically optimized room, there will most likely be disturbing resonances on the recording, which should be filtered out in the first step. To locate them, you can simply place an EQ plugin on your vocal track. Boost one of the bands with high gain after setting a narrow Q for that band. After that, slowly move the EQ band through the entire frequency spectrum. If certain frequencies are particularly loud and unpleasant, they are probably room resonances that should now be filtered out by lowering the band.
How much you filter out varies from resonance to resonance. In any case, it should no longer disturb the subjective sound impression. Focus mainly on the biggest problem areas. Note, however, that too many cuts with the EQ can cause phase shifts and comb filter effects if you're not careful. Over time, you will develop a sense of where the noisy areas are and to what extent you need to lower them.
Compression:
Vocals are very dynamic. They often change from soft to loud in a very short time. When you try to give consistency to a song, they tend to stand out.
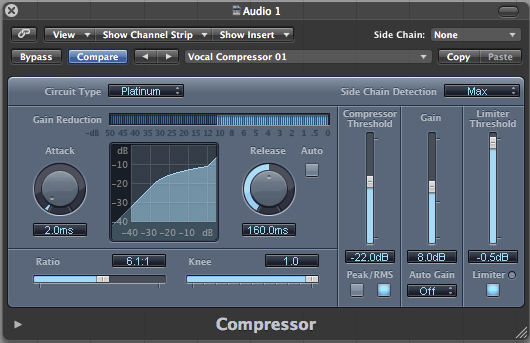
Accordingly, in the vast majority of cases you will use compression to control and limit the dynamics of the vocal. Think of your vocal track as having an extremely large dynamic range, and you need to use strong compression to tame the vocals. When a compressor is working particularly hard, it usually sounds mechanical and unnatural. You may have heard it before, it's sometimes called an "over-compressed" sound. But how can you counteract this if you need a lot of compression?
The trick is called serial compression. With a few light compressors in a row, the vocal sounds controlled and natural at the same time. Serial compression uses a few mild compressors instead of a single powerful one. It doesn't sound as if it has been heavily compressed, even when the same amount of compression has been used. Let's take a look at how to create serial compression. Put a compressor on the track of your vocals. Then lower the threshold and increase the ratio to extreme settings. This allows you to hear the compressor clearly. Start at an average attack time of about 15ms and then adjust it to your taste. A fast attack (5ms) makes your vocals thicker and heavier. A slow attack (30ms) makes your vocals powerful and aggressive. Set an average release time of 40ms and change it as needed. Try feeding the compressor into the pulse of the music. If you have set an attack and release time, you can reduce the ratio to about 1.5:1 to 3:1. Adjust the threshold and ration so that the average gain reduction is about 2-3 dB. Increase your output gain until the track volume returns to the previous level. Finally, you need to duplicate the compressor plugin. Check the settings to make sure you get the same amount of gain reduction. If you want more gain reduction, simply duplicate the plugin again. Keep in mind that these settings may not work throughout the song.
Equalization II - Use another equalizer to shape the sound:
Of course, every voice sounds different and the EQ interventions depend on individual taste, musical style, other tracks and the overall mix, so there is no magic formula. Nevertheless, there are some characteristic ranges in the frequency spectrum that should not go unmentioned. We have already discussed how you can use an equalizer to bring order to your vocals in the first step. But an equalizer can do much more: let's see how you can bring the sound of your vocals into the desired direction.
In the range from about 1kHz a slight boost can provide additional presence, a reduction in the same range will soften the vocals.
If your vocals sound too hard and harsh, a small reduction in the range of 2 - 4kHz will help. With a sweep you slowly go through this range to find the exact problem frequency.
If you want a bit more clarity and brightness, carefully try a light boost with a hi-shelf filter from about 6kHz.
I suggest again that you be careful during these interventions. Your boosts and cuts should normally be between 2-3 dB and exceed 5 dB only if the mix absolutely requires it or you want to get a really nasty room frequency under control.
Reverb & Delay - Bring your vocals to life:
After the previous steps your vocals should already sound pretty good. But if you have recorded them in a booth or a dry room - which I recommend in any case - you will quickly notice that they will sound very dry and not very three-dimensional, in short - they sound flat. This starting point is perfect to turn to the effects that add the necessary spatial depth: reverb and delay.
After inserting your desired reverb plugin, set the signal to completely wet to make sure you only hear the signal with reverb. Then adjust your reverb to the tempo of the track respectively project. To do this, set the reverb time to 4 seconds and then slowly but surely adjust it down until it sounds good. The lower the reverb time, the easier it is to avoid a muddy mix. This normally results in a reverb time of less than 2 seconds. Your reverb should end before the next phrase. This means that the last reverb tail of a part should also end in that part and not in the beginning of the next part. This way you make sure that your vocals sound tight and not blurred.
Once the reverb time is set, you can set the pre-delay. The pre-delay determines how long it takes for the reverb to start after the vocals have started. The Pre-Delay setting, so that the reverb does not make the beginning of the words muddy. Experiment with different pre-delay times to find out which one suits your song best. Normally, the range between 20-100 ms is fine.
Now we'll focus on the distance of the reverb. This determines the distance between the listeners and the source of the vocal in the room. If you want your vocals to be as central and personal as possible, try a very low distance. Last but not least, you switch an EQ plugin in front of the reverb to control the sound of the room.
The sound of your vocal reverb has a big influence on the sound of the actual vocals. Often you can use reverb to fix problems that you couldn't solve before while editing the vocals. For example, if your vocal is too dark, it's a good idea to cut out the lower center frequencies and boost the upper ones. This way you get a nice subtle shimmer without having to boost the top end of the vocal itself. It's also usually a good idea to cut out the lower frequencies of the reverb. This area is not very useful for vocals - it just rumbles the mix.
Listen to the song as a loop and turn the reverb down completely. Then slowly bring it back up until you notice it. When you reach this point, turn it a little bit down again - usually you overestimate how loud the reverb should be. Basically, reverb and delay should not be heard, but felt. If they are obvious and very perceptible, the correct level is exceeded. The right level is reached when the vocal fells right in the context of the mix.
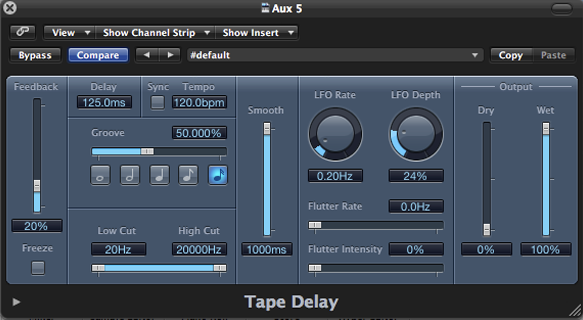
The procedure for using a delay is quite similar to reverb. Just like the reverb, the delay should be completely wet at the beginning. Separate the both stereo channels, because we want to change the delay times of both sides independently. Set one side to 50-200 ms and the other 20-50 ms behind it. The exact number depends on how obvious you want the effect to be. The longer the delay, the more obvious it becomes. Just turn the delay time up and then slowly down again until you feel the delay sounds right. Then set the feedback to 0-15% feedback. Normally the delay has no feedback, which means there is only one repetition. But a few additional delays make the effect sound more natural. Now you do the same thing as before with the reverb. Shape the sound with an EQ. But not in exactly the same way. Delays usually have filters in the lower and upper frequency ranges to match the delay to the vocal. I usually cut from about 300Hz up to a maximum of 3kHz. Trust your ears and cut only as much as necessary. Last but not least, you have to blend the delay in. The process is the same as for reverb. Turn the delay all the way down while playing the song as a loop. Then carefully turn it up until it feels right.
Tips & Tricks
As with almost everything in music production, there are no strict guidelines when processing vocals. However, I'd like to give you some tips that can improve your approach.
1. The 200-500 Hz range is crucial for warmth and weight in vocals. Too little will sound thin and weak, but too much will sound muddy or congested.
2. Start when setting the compressor with an attack time of 6ms and a release time of 60ms for vocals.
3. For consistent vocal sound, combine compression with automation.
4. The 2 kHz range gives vocals and lead sounds edge and bite. Too little will sound soft and muted, but too much can be painful.
5. Using multiple compressors in a row (especially on vocals) can sound more musical and subtle.
6. In most cases you should not completely take out breath sounds, as they make your vocals sound real and lively.
7. Record your vocal tracks as dry as possible. Adding effects is easier than removing effects.
8. The use of lower Q-values when boosting produces a more natural sound. Cutting with a narrow band allows you to remove problem frequencies without making a track sound hollow.
9. A bit of distortion or saturation can make your vocals thicker and let them cut through the mix by adding harmonics.
10. Always keep in mind that the best editing, the best processing and the best mix cannot compensate for bad raw material. A good vocal track starts with a good recording. Choosing the right mic and arranging the best takes may cost you time and effort, but it's the only way to get a good result.
As always, have fun trying it out!
